| Basic Information and Brief Reviews of Ski & Snowboard Mountaineering Equipment | |
|
| |
This page is a continuation of my main Ski Mountaineering Equipment page. It was last updated in December 2000, and further additions should be forthcoming. |
|
Sections: Alpine Touring | Figle/Skiboard | Telemark | Snowboard | Avalanche Safety | Lightweight Mtneering | Useful Gadgets | Where to Buy?
Essential Avalanche Safety Gear
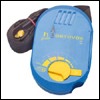 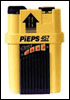 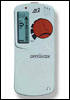 |
Avalanche Transceivers (Beacons): The greatest danger faced in ski mountaineering and backcountry skiing is undoubtedly avalanches. Avalanche transceivers allow other members of the party to locate a victim and effect a rescue, since outside help will almost always be too late in arriving in the backcountry. All those carrying transceivers must be trained in their proper use, since the learning curve is typically quite steep at first. Avalanche beacon classes are offered by many guide services, clubs, and organizations, including most outdoor/climbing stores. It is essential to learn how to use any beacon properly, and to practice its use regularly to keep one's skills sharp. You and the other members of your party must be skillful enough to carry out a rapid search, within a few minutes of the accident, and also be equipped with the proper equipment to extract the victim once found (see below). Without the proper training and ancillary equipment (shovels, probes, etc.), the avalanche transceiver will most likely serve only as an aid to body recovery. Since 1998, the design of avalanche transceivers has undergone a major revolution, with the introduction and widespread adoption of digital transceiver technology. These beacons use a multidimensional antenna and digital microprocessor to calculate the direction and distance to the buried target beacon, eliminating the need for the complex and difficult-to-master grid search method often required with analog beacons. Digital beacons are much easier for novices to learn to use, a major improvement over the traditionally steep learning curve of the older analog beacons. The most directional of the digital beacons allow one to do a much faster induction-line search during the initial stages, which is basically a smoother version of the tangent-line search, and eliminate the initial grid search entirely. However, digital beacons are not a magic cure-all, and those who are skilled in the use of an analog beacon with signal-strength LEDs such as the Ortovox F1 (top left) or Pieps Opti4 (upper left) can still search faster than novices using a digital beacon. That said, anyone planning to purchase a new beacon should strongly consider a digital beacon, such as the Ortovox M2 (left), BCA Tracker DTS (lower left), Barryvox, and Arva 9000, all of which cost about $300. There are several important differences between these models, related to their range and type of signal processing. All of the beacons claim ranges of 80-90 m, but most practical tests reveal that the true range is much less, often 30-40 m, with the Ortovox typically having a slight advantage. However, the Tracker DTS is the only one which has dual antennas, thus giving it a possible advantage in directionality. An even greater difference during actual use is whether the beacon provides any access to the original (analog) signal sent out by the buried target beacon. The Ortovox M1/M2 is essentially an analog beacon with added digital processing, so the actual amplified beeping of the buried transceiver can be heard during a search (just like an analog beacon), along with digital information presented on the LCD display. In the other digital beacons, the beeps they provide have no relation to the signal transmitted by the buried target, and simply increase in frequency as the distance to the target decreases. Some people strongly prefer one type or the other, so it is useful to try some practice searches with several models (by renting or borrowing) before making a final decision. |
||
| |
|||
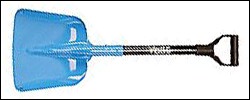
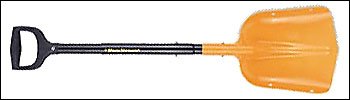
| Shovels: Even if an avalanche victim is located using a transceiver, they won't survive unless they are quickly dug out of the snow. Avalanche debris typically sets up rock hard as soon as it comes to a halt, making digging without proper tools difficult or impossible. An aluminum shovel is the best tool for the job, since it is light enough to carry easily yet hard enough to break through frozen snow. In addition to avalanche rescue, shovels are essential for building tent platforms and cooking areas when camping on snow, and they make building emergency shelters such as snow caves much easier. Popular models include the Voile Tele-Pro (below left) and Black Diamond Bobcat (below right), which feature telescoping, removable handles with solid D-style grips. The telescoping handle provides greatly improved leverage when extended for moving large quantities of snow. Several companies including Life-Link and Ortovox make shovels which have blades made of Lexan, a strong, nearly unbreakable polycarbonate plastic. These are usually slightly lighter than an aluminum blade, but the Lexan blade is not hard enough to chop through solidly frozen avalanche debris, even if the blade itself does not break. Despite the small additional weight, it is my belief that the most useful shovel for general ski mountaineering is a telescoping model with D-grip handle and aluminum blade. Most mountaineering shovels cost about $30 to $60. |
|||
 |
|||
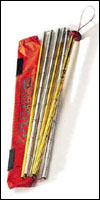 |
Avalanche Probes: In situations where an avalanche victim is not wearing a transceiver or the signal can not be located, probing the debris field in a systematic manner is the only hope for survival. Even when a transceiver is located and its location narrowed down to a small area, a probe is useful for quickly determining the presence of a buried victim. Sectional probes such as those made by G3 (left), Life-Link, and Ortovox are the most useful, since the wired sections assemble quickly to form a 8-10 ft (240-320 cm) probe with a hardened tip which easily penetrates avalanche debris. The relatively new G3 probe is notably stiffer (more rigid) than the others and is gaining wide acceptance. These sectional probes typically cost about $60-100. Adjustable ski poles which can be joined to form a probe, such as various models from Black Diamond and Life-Link, are useful when a sectional probe is unavailable. However, it takes time to remove baskets and assemble the poles into a probe, and the resulting probe is typically only 6 ft (2 m) long, with a tip that does not penetrate as well as that of a real probe. A good solution is for all members of a party to carry probe-convertible ski poles, with a couple of sectional probes carried as group gear. A recent development in the past couple of years has been the inclusion of either avalanche probes or snow saws inside the handles of shovels. This is a very useful innovation, taking advantage of otherwise dead space, and many companies including Black Diamond, Voile, and others have added models with this capability. However, one caveat is that an avalanche probe which fits within a shovel handle is typically too thin for adequate rigidity and too short (only 1.8 m) for located deep burials. Therefore, I think a snow saw is a much better item to store in a shovel handle, since an adequate-sized saw fits easily inside. Snow saws are useful for a number of tasks, including cutting snow blocks for igloos and wind barriers, and most importantly for cutting Rutschblocks or snow columns for avalanche stability tests. For those saws stored in shovel handles, the handle can typically be used as an extension to increase the cutting depth of the snow-saw. |
||
| |
|||
 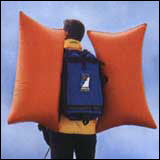 |
New Avalanche Survival Devices: Avalung.... Avalanche airbag..... |
||
| |
Sections: Alpine Touring | Figle/Skiboard | Telemark | Snowboard | Avalanche Safety | Lightweight Mtneering | Useful Gadgets | Where to Buy?
Lightweight Mountaineering Gear
This section is in preparation... I have been using / testing lightweight aluminum ice axe and crampons,
along with an 8mm rope for glacier travel, on many recent trips. Such gear is ideally suited for
ski mountaineering trips and can save many pounds overall. Examples of this gear:
- Camp LC 480 crampons
- Camp Highlander ice axe
- Grivel AirTech Racing ice axe
- Blue Water Ice Floss 8mm x 37m rope
Sections: Alpine Touring | Figle/Skiboard | Telemark | Snowboard | Avalanche Safety | Lightweight Mtneering | Useful Gadgets | Where to Buy?
Useful Gadgets
This section is in preparation... Items to be reviewed include altimeter watches, GPS receivers, and digital cameras
which are particularly well-suited for ski mountaineering use, such as:
- Avocet Vertech altimeter watch
- Suunto Vector/Altimax altimeter watch
- Garmin eTrex GPS receiver
- Canon Powershot series digicams: S30, S40
Sections: Alpine Touring | Figle/Skiboard | Telemark | Snowboard | Avalanche Safety | Lightweight Mtneering | Useful Gadgets | Where to Buy?
Where to Buy?
See the Ski Mountaineering Web Links page for links to numerous retailers and manufacturers.